绕过软件更新包加密,提取Lexmark MC3224i打印机固件(第1篇)
导语:在本文中,我们将为读者详细介绍如何绕过软件更新包加密机制,以提取Lexmark MC3224i打印机的固件。
2021年11月3日,Zero Day Initiative Pwn2Own宣布,NCC Group EDG(Exploit Development Group)在MC3224i打印机固件中发现了一个远程漏洞,攻击者可以利用该漏洞获得该设备的完全控制权限。请注意,这里的打印机运行的是最新版本的固件CXLBL.075.272。
Lexmark MC3224i是一款广受欢迎的多合一彩色激光打印机,在各个电商网站上都卖的很火,所以,Austin 2021 Pwn2Own也将其列为安全测试对象之一。
目前,该漏洞已经得到了修复。在下一篇文章中,我们将详细介绍该漏洞的详情以及相应的利用方法。
由于Lexmark公司对提供给消费者的固件更新包进行了加密处理,这无疑提高了相关二进制代码的分析难度。由于我们的研究时间只有一个多月,而且关于目标的参考资料基本为零,所以,我们决定拆下闪存,并使用编程器来提取其中的固件,因为我们(正确地)估计固件是以未加密的形式存储的。这样做的好处是,可以避开固件更新包加密所造成的障碍。提取固件后,可以对二进制文件进行逆向分析,以检查其中是否存在远程代码执行漏洞。
从闪存中提取固件
PCB概述
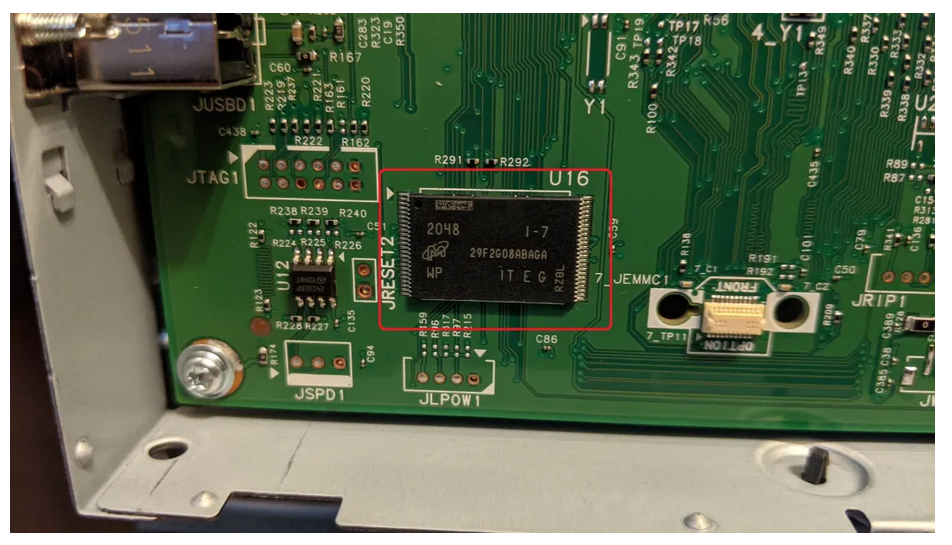
我们发现,主印刷电路板(PCB)位于打印机的左侧。该设备由专为打印机行业设计的Marvell 88PA6220-BUX2片上系统(SoC)进行供电的,而固件则存储在Micron MT29F2G08ABAGA NAND闪存(2Gb,即256MB)中。并且,NAND闪存可以很容易地在PCB的左下方找到:

串行输出
之后,我们很快就找到了UART连接器,因为它在PCB上被标为JRIP1,具体如下图所示:

之后,我们焊接了三根线,分别用于:
查看启动日志,通过观察设备的分区信息了解闪存的布局情况。
扫描启动日志,看看是否有迹象表明打印机进行了软件签名验证。
希望能在引导加载程序(U-Boot)或操作系统(Linux)中获得一个shell。
打印机启动过程中,串行输出(115200波特)的内容如下所示:
Si Ge2-RevB 3.3.22-9h 12 14 25
TIME=Tue Mar 10 21:02:36 2020;COMMIT=863d60b
uidc
Failure Enabling AVS workaround on 88PG870
setting AVS Voltage to 1050
Bank5 Reg2 = 0x0000381E, VoltBin = 0, efuseEscape = 0
AVS efuse Values:
                                Efuse Programed = 1
                                Low VDD Limit = 32
                                High VDD Limit = 32
                                Target DRO = 65535
                                Select Vsense0 = 0
a
Calling Configure_Flashes @ 0xFFE010A8 12 FE 13 E0026800
fves
DDR3 400MHz 1x16 4Gbit
rSHA compare Passed 0
SHA compare Passed 0
l
Launch AP Core0 @ 0x00100000


U-Boot 2018.07-AUTOINC+761a3261e9 (Feb 28 2020 - 23:26:43 +0000)

DRAM:  512 MiB
NAND:  256 MiB
MMC:   mv_sdh: 0, mv_sdh: 1, mv_sdh: 2
lxk_gen2_eeprom_probe:123: No panel eeprom option found.
lxk_panel_notouch_probe_gen2:283: panel uicc type 68, hw vers 19, panel id 98, display type 11, firmware v4.5, lvds 4
found smpn display TM024HDH49 / ILI9341 default
lcd_lvds_pll_init: Requesting dotclk=40000000Hz
found smpn display Yeebo 2.8 B
ubi0: default fastmap pool size: 100
ubi0: default fastmap WL pool size: 50
ubi0: attaching mtd1
ubi0: attached by fastmap
ubi0: fastmap pool size: 100
ubi0: fastmap WL pool size: 50
ubi0: attached mtd1 (name "mtd=1", size 253 MiB)
ubi0: PEB size: 131072 bytes (128 KiB), LEB size: 126976 bytes
ubi0: min./max. I/O unit sizes: 2048/2048, sub-page size 2048
ubi0: VID header offset: 2048 (aligned 2048), data offset: 4096
ubi0: good PEBs: 2018, bad PEBs: 8, corrupted PEBs: 0
ubi0: user volume: 7, internal volumes: 1, max. volumes count: 128
ubi0: max/mean erase counter: 2/1, WL threshold: 4096, image sequence number: 0
ubi0: available PEBs: 0, total reserved PEBs: 2018, PEBs reserved for bad PEB handling: 32
Loading file '/shared/pm/softoff' to addr 0x1f6545d4...
Unmounting UBIFS volume InternalStorage!
Card did not respond to voltage select!
bootcmd: setenv cramfsaddr 0x1e900000;ubi read 0x1e900000 Kernel 0xa67208;sha256verify 0x1e900000 0x1f367000 1;cramfsload 0x100000 /main.img;source 0x100000;loop.l 0xd0000000 1
Read 10908168 bytes from volume Kernel to 1e900000
Code authentication success
### CRAMFS load complete: 2165 bytes loaded to 0x100000
## Executing script at 00100000
### CRAMFS load complete: 4773416 bytes loaded to 0xa00000
### CRAMFS load complete: 4331046 bytes loaded to 0x1600000
## Booting kernel from Legacy Image at 00a00000 ...
   Image Name:   Linux-4.17.19-yocto-standard-74b
   Image Type:   ARM Linux Kernel Image (uncompressed)
   Data Size:    4773352 Bytes = 4.6 MiB
   Load Address: 00008000
   Entry Point:  00008000
## Loading init Ramdisk from Legacy Image at 01600000 ...
   Image Name:   initramfs-image-granite2-2020063
   Image Type:   ARM Linux RAMDisk Image (uncompressed)
   Data Size:    4330982 Bytes = 4.1 MiB
   Load Address: 00000000
   Entry Point:  00000000
## Flattened Device Tree blob at 01500000
   Booting using the fdt blob at 0x1500000
   Loading Kernel Image ... OK
   Using Device Tree in place at 01500000, end 01516aff
UPDATING DEVICE TREE WITH st:1fec4000 sz: 12c000

Starting kernel ...

Booting Linux on physical CPU 0xffff00
Linux version 4.17.19-yocto-standard-74b7175b2a3452f756ffa76f750e50db (oe-user@oe-host) (gcc version 7.3.0 (GCC)) #1 SMP PREEMPT Mon Jun 29 19:46:01 UTC 2020
CPU: ARMv7 Processor [410fd034] revision 4 (ARMv7), cr=30c5383d
CPU: div instructions available: patching division code
CPU: PIPT / VIPT nonaliasing data cache, VIPT aliasing instruction cache
OF: fdt: Machine model: mv6220 Lionfish 00d L
earlycon: early_pxa0 at MMIO32 0x00000000d4030000 (options '')
bootconsole [early_pxa0] enabled
FIX ignoring exception 0xa11 addr=fb7ffffe swapper/0:1
...
根据我们在审查其他设备方面的经验来说,有时可以通过访问UART引脚获得完整的Linux shell。不过,在MC3224i设备上,UART RX引脚似乎没有被启用,因此,我们只能查看引导日志,而无法与系统进行交互。它可能是通过SoC上的E型保险丝来禁用引脚的。或者,零欧姆电阻器可能已经从生产设备的PCB上移除,在这种情况下,我们就有机会重新启用它。由于我们的主要目标是拆除闪存并提取固件,所以,我们没有进一步研究这个引脚。
从闪存中转储固件
拆除和转储(或重新编程)闪存比大多数人想象中的要容易得多,而且这样做的好处有很多:它通常允许我们启用调试功能,获得对Shell的访问权,读取敏感密钥,并在某些情况下绕过固件签名验证。在我们的案例中,我们的目标是提取文件系统,并对二进制文件进行逆向工程,因为Pwn2Own规则明确规定,只有远程执行的漏洞才能被接受。不过,对exploit开发工作来说,则没有任何限制。重要的是,要把exploit的开发和执行看作是不同的工作。虽然执行过程决定了攻击的可扩展性和攻击者的成本,但利用代码的开发过程(或NRE)只需要一次,因此,即使我们在后者上面消耗了大量的时间和设备,也不会对执行工作造成影响。而防御者的工作,就增加exploit的执行难度。
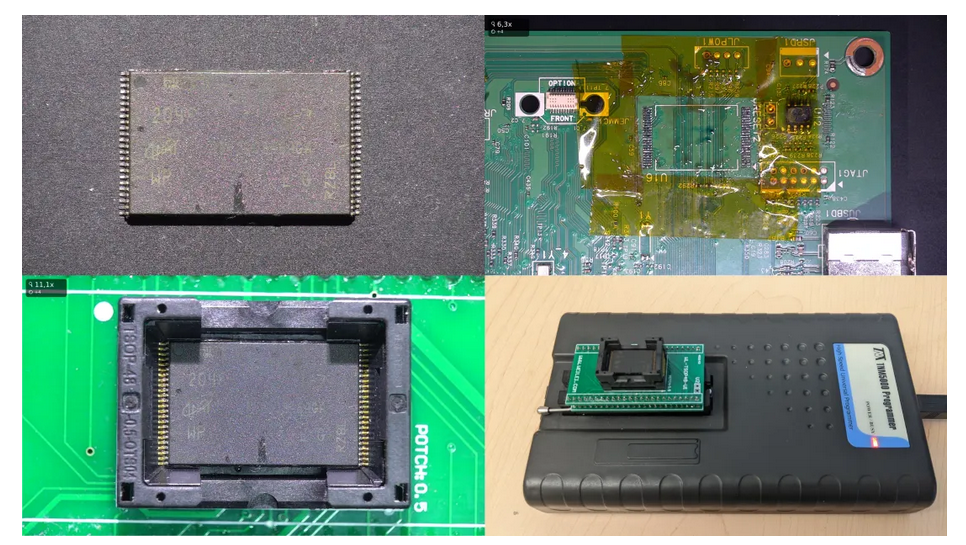
借助于热风机之类的工具,我们可以轻松将闪存拆下来。在清洗完引脚后,我们使用带有TSOP-48适配器的TNM5000编程器来读取闪存的内容。首先,我们要确保闪存正确连接到适配器上,选择正确的闪存标识符,然后,我们就可以读取闪存的全部内容,并将其保存到文件中了。重新安装闪存时,也需要仔细进行,以确保设备的功能不受影响。整个过程大约花了一个小时,包括在显微镜下测试连接。万幸的是,打印机成功地启动了! 好了,这部分工作就大功告成了……

转储的闪存映像的长度正好是285,212,672字节,很明显,这比256MB(268,435,456字节)还要长。这是因为,在读取闪存的原始读取时,还包括备用区域,也被称为页面OOB(带外)数据区域。下面的内容来自Micron公司的说明文档:
内部ECC对于主要区域的每528字节(x8)和备用区域的每16字节(x8)提供了9位检测码和8位校正码。[...]
在PROGRAM操作过程中,在页面被写入NAND Flash阵列之前,设备会在缓存寄存器中的2k页面上计算ECC代码。ECC代码被存储在页面的备用区域。
在读操作中,页面数据从阵列中被读到缓存寄存器中,在那里ECC代码被计算出来,并与从阵列中读取的ECC代码值进行比较。如果检测出1-8位的错误,将通过高速缓存寄存器进行纠正。只有经过纠正的数据,才会在I/O总线上输出。
NAND闪存是以内存页为单位进行编程和读取的。一个内存页由2048字节的可用存储空间和128字节的OOB组成,后者用于存储纠错代码和坏块管理的标志,也就是说,页面的总长度为2176字节。不过,对于擦除操作来说,则是以块为单位进行的。根据Micron公司的文档,对于这个闪存部分,一个块由64页组成,总共有128KB的可用数据。该闪存由两个面组成,每个面包含1024个块,因此:
2 planes * 1024 blocks/plane * 64 pages/block * (2048 + 128) bytes/page = 285,212,672
由于备用区域仅用于闪存管理,并且不包含有用的用户数据,因此,我们编写了一个小脚本,将每个2048字节的页面后面128字节的OOB数据删除,结果文件长度正好是256MB。
分析转储的固件
提取Marvell映像
还记得我们说过该打印机是由Marvell芯片组供电的吗?这时,这些信息就排上用场了。虽然88PA6220是专门为打印机行业设计的,但其固件映像的格式看起来与其他Marvell SoC是一样的。因此,GitHub上有许多类似处理器的文件或代码,可以作为参考。例如,我们看到该映像以TIM(可信映像模块)头部开始。该头部包含大量关于其他映像的信息,其中一些信息被用来提取单个映像:

TIM头部的格式如下面最后一个结构体所示(显然,它假定OOB数据已经被删除):
typedef struct {
   unsigned int Version;
   unsigned int Identifier;
   unsigned int Trusted;
   unsigned int IssueDate;
   unsigned int OEMUniqueID;
} VERSION_I;

typedef struct {
   unsigned int Reserved[5];
   unsigned int BootFlashSign;
} FLASH_I, *pFLASH_I;

// Constant part of the header
typedef struct {
{
   VERSION_I VersionBind;
   FLASH_I FlashInfo;
   unsigned int NumImages;
   unsigned int NumKeys;
   unsigned int SizeOfReserved;
} CTIM, *pCTIM;

typedef struct {
   uint32_t ImageID;                      // Indicate which Image
   uint32_t NextImageID;                  // Indicate next image in the chain
   uint32_t FlashEntryAddr;               // Block numbers for NAND
   uint32_t LoadAddr;
   uint32_t ImageSize;
   uint32_t ImageSizeToHash;
   HASHALGORITHMID_T HashAlgorithmID;     // See HASHALGORITHMID_T
   uint32_t Hash[16];                     // Reserve 512 bits for the hash
   uint32_t PartitionNumber;
} IMAGE_INFO_3_4_0, *pIMAGE_INFO_3_4_0;   // 0x60 bytes

typedef struct {
   unsigned intKeyID;
   unsigned int HashAlgorithmID;
   unsigned int ModulusSize;
   unsigned int PublicKeySize;
   unsigned int RSAPublicExponent[64];
   unsigned int RSAModulus[64];
   unsigned int KeyHash[8];
} KEY_MOD, *pKEY_MOD;

typedef struct {
   pCTIM pConsTIM;                        // Constant part
   pIMAGE_INFO pImg;                      // Pointer to Images (v 3.4.0)
   pKEY_MOD pKey;                         // Pointer to Keys
   unsigned int *pReserved;               // Pointer to Reserved Area
   pPLAT_DS pTBTIM_DS;                    // Pointer to Digital Signature
} TIM;正如下文所详述的那样,该处理器的保护措施是由Lexmark团队提供的,所以,让我们先来看看有助于提取映像的相关字段。关于每个字段的完整描述,请参考这里的参考手册:
VERSION_I:常规TIM头部信息。
Version (0x00030400):TIM头部的版本(3.4.0)。它对以后确定使用哪个版本的映像信息结构(IMAGE_INFO_3_4_0)非常有用。
Identifier (0x54494D48):其值总是ASCII字符串“TIMH”,用于识别有效头部。
Trusted (0x00000001):0代表不安全的处理器,1代表安全。该处理器已经被Lexmark保护起来,因此,只有经过签名的固件才允许在这些设备上运行。
FLASH_I:启动闪存属性。
NumImages (0x00000004):表示头部中有四个结构体,描述构成固件的映像。
NumKeys (0x00000001):这个头部中有一个密钥信息结构体。
SizeOfReserved (0x00000000):在TIM头部末尾的签名之前,OEM可以保留最多4KB(sizeof(TIMH))空间供其使用。Lexmark没有使用这个功能。
IMAGE_INFO_3_4_0:映像1的信息。
ImageID (0x54494D48):映像的ID("TIMH"),本例中为TIM头部。
NextImageID (0x4F424D49):下一个映像的ID("OBMI"),OEM启动模块映像。
FlashEntryAddr (0x00000000):TIM头部对应的闪存索引。
ImageSize (0x00000738):映像的大小,1,848字节被头部占用。
IMAGE_INFO_3_4_0 :映像2的信息。
ImageID (0x4F424D49):映像的ID("OBMI"),OEM启动模块映像。OBM由Marvell公司提供,负责启动打印机所需的任务。看一下UART的启动日志,在U-Boot启动信息之前显示的所有内容,都是由OBM代码显示的。至于功能方面,OBM将设置DDR和应用处理器核心0,并对随后加载的固件(U-Boot)进行了固件签名验证。
NextImageID (0x4F534C4F):下一个映像的ID("OSLO")。
FlashEntryAddr (0x00001000):OBMI的闪存索引。
ImageSize (0x0000FD40):映像的大小,OBMI长度为64,832字节。
IMAGE_INFO_3_4_0:映像3的信息。
ImageID (0x4F534C4F):映像的ID("OSLO"),包含U-Boot代码。
NextImageID (0x54524458):下一个映像的ID("TRDX")。
FlashEntryAddr (0x000C0000):OSLO映像的闪存索引。
ImageSize (0x000712FF):映像的大小,OSLO长度为463,615字节。
IMAGE_INFO_3_4_0:映像4的信息。
ImageID (0x54524458):映像的ID("TRDX"),包含Linux内核和设备树映像(可能用于恢复)。
NextImageID (0xFFFFFFFF):后面映像的ID,这个值表示后面已经没有映像了。
FlashEntryAddr (0x00132000):TRDX映像的闪存索引。
ImageSize (0x000E8838):映像的大小,TRDX长度为952,376字节。
当然,这些Marvell的映像只占用了闪存容量中的一小部分。观察这些映像,我们发现UBI擦除块的签名“UBI#”,每隔131,072字节(即128KB),也就是每隔一个闪存块(1块*64页/块*2048字节/页)就会出现一次。我们将看到,总共有2,024个UBI块,形成了一个253MB的文件(我们将其命名为ubi_data.bin)。
$ file ubi_data.bin
ubi_data.bin: UBI image, version 1
我们希望这个文件包含我们要找的东西。
提取UBI卷
好的,我们已经得到了一个UBI映像(名为UBI_Data.bin),其中包含所有UBI块:
那么,接下来该怎么办?首先,我们要获得关于UBI的更多信息……
每个擦除块的第一页的前四个字节都是“UBI#”,如上所述。这表明第一页被erase count头部所占据,该头部包含用于磨损保护操作的统计数据。如果这些块包含用户数据,则块中的第二页被卷头(以“UBI!”开头)占据。由于每个块的前两页用于保存元数据,所以,64页中只有62页(124KB)可用于存放用户数据,这比预期的128KB少一点。
下面,让我们使用ubi_read工具看看里面到底有什么:
2024个擦除块
1302个用于数据的块(卷的一部分),代表所有卷的块数总和
7个卷:Kernel、Base、Copyright、Engine、InternalStorage、MBR、ManBlock
$ ubireader_display_info ubi_data.bin
UBI File
---------------------
         Min I/O: 2048
         LEB Size: 126976
         PEB Size: 131072
         Total Block Count: 2024
         Data Block Count: 1302
         Layout Block Count: 2
         Internal Volume Block Count: 1
         Unknown Block Count: 719
         First UBI PEB Number: 2.0

         Image: 0
         ---------------------
                  Image Sequence Num: 0
                  Volume Name:Kernel
                  Volume Name:Base
                  Volume Name:Copyright
                  Volume Name:Engine
                  Volume Name:InternalStorage
                  Volume Name:MBR
                  Volume Name:ManBlock
                  PEB Range: 0 - 2023

                  Volume: Kernel
                  ---------------------
                          Vol ID: 2
                          Name: Kernel
                          Block Count: 95

                          Volume Record
                          ---------------------
                                   alignment: 1
                                   crc: '0x8abc33f6'
                                   data_pad: 0
                                   errors: ''
                                   flags: 0
                                   name: 'Kernel'
                                   name_len: 6
                                   padding: '\x00\x00\x00\x00\x00\x00\x00\x00\x00\x00\x00\x00\x00\x00\x00\x00\x00\x00\x00\x00\x00\x00\x00'
                                   rec_index: 2
                                   reserved_pebs: 133
                                   upd_marker: 0
                                   vol_type: 'dynamic'

                  Volume: Base
                  ---------------------
                          Vol ID: 3
                          Name: Base
                          Block Count: 927

                          Volume Record
                          ---------------------
                                   alignment: 1
                                   crc: '0xc3f30751'
                                   data_pad: 0
                                   errors: ''
                                   flags: 0
                                   name: 'Base'
                                   name_len: 4
                                   padding: '\x00\x00\x00\x00\x00\x00\x00\x00\x00\x00\x00\x00\x00\x00\x00\x00\x00\x00\x00\x00\x00\x00\x00'
                                   rec_index: 3
                                   reserved_pebs: 1132
                                   upd_marker: 0
                                   vol_type: 'dynamic'

                  Volume: Copyright
                  ---------------------
                          Vol ID: 4
                          Name: Copyright
                          Block Count: 1

                          Volume Record
                          ---------------------
                                   alignment: 1
                                   crc: '0xa065ca'
                                   data_pad: 0
                                   errors: ''
                                   flags: 0
                                   name: 'Copyright'
                                   name_len: 9
                                   padding: '\x00\x00\x00\x00\x00\x00\x00\x00\x00\x00\x00\x00\x00\x00\x00\x00\x00\x00\x00\x00\x00\x00\x00'
                                   rec_index: 4
                                   reserved_pebs: 3
                                    upd_marker: 0
                                   vol_type: 'dynamic'

                  Volume: Engine
                  ---------------------
                          Vol ID: 15
                          Name: Engine
                          Block Count: 21

                          Volume Record
                          ---------------------
                                   alignment: 1
                                   crc: '0x66c80b4b'
                                   data_pad: 0
                                   errors: ''
                                   flags: 0
                                   name: 'Engine'
                                   name_len: 6
                                   padding: '\x00\x00\x00\x00\x00\x00\x00\x00\x00\x00\x00\x00\x00\x00\x00\x00\x00\x00\x00\x00\x00\x00\x00'
                                   rec_index: 15
                                   reserved_pebs: 34
                                   upd_marker: 0
                                   vol_type: 'dynamic'

                  Volume: InternalStorage
                  ---------------------
                          Vol ID: 24
                          Name: InternalStorage
                          Block Count: 256

                          Volume Record
                          ---------------------
                                   alignment: 1
                                   crc: '0x962ca517'
                                   data_pad: 0
                                   errors: ''
                                   flags: 0
                                   name: 'InternalStorage'
                                   name_len: 15
                                   padding: '\x00\x00\x00\x00\x00\x00\x00\x00\x00\x00\x00\x00\x00\x00\x00\x00\x00\x00\x00\x00\x00\x00\x00'
                                   rec_index: 24
                                   reserved_pebs: 674
                                   upd_marker: 0
                                   vol_type: 'dynamic'

                  Volume: MBR
                  ---------------------
                          Vol ID: 90
                          Name: MBR
                          Block Count: 1

                          Volume Record
                          ---------------------
                                   alignment: 1
                                   crc: '0x5fee82ff'
                                   data_pad: 0
                                   errors: ''
                                   flags: 0
                                   name: 'MBR'
                                   name_len: 3
                                   padding: '\x00\x00\x00\x00\x00\x00\x00\x00\x00\x00\x00\x00\x00\x00\x00\x00\x00\x00\x00\x00\x00\x00\x00'
                                   rec_index: 90
                                   reserved_pebs: 2
                                   upd_marker: 0
                                   vol_type: 'static'

                  Volume: ManBlock
                  ---------------------
                          Vol ID: 91
                          Name: ManBlock
                          Block Count: 1

                          Volume Record
                          ---------------------
                                   alignment: 1
                                   crc: '0x28cd6521'
                                   data_pad: 0
                                   errors: ''
                                   flags: 0
                                   name: 'ManBlock'
                                   name_len: 8
                                   padding: '\x00\x00\x00\x00\x00\x00\x00\x00\x00\x00\x00\x00\x00\x00\x00\x00\x00\x00\x00\x00\x00\x00\x00'
                                   rec_index: 91
                                   reserved_pebs: 2
                                   upd_marker: 0
                                   vol_type: 'static'
好了,现在将上面提到的七个卷提取到ubi_data_bin_extracted文件夹中:
$ ubireader_extract_images ubi_data.bin -v -o ubi_data_bin_extracted
$ ls -lh ubi_data_bin_extracted/ubi_data.bin/
-rw-rw-r-- 1 cvisinescu cvisinescu 113M Jan 17 19:10 img-0_vol-Base.ubifs
-rw-rw-r-- 1 cvisinescu cvisinescu 124K Jan 17 19:10 img-0_vol-Copyright.ubifs
-rw-rw-r-- 1 cvisinescu cvisinescu 2.6M Jan 17 19:10 img-0_vol-Engine.ubifs
-rw-rw-r-- 1 cvisinescu cvisinescu  49M Jan 17 19:10 img-0_vol-InternalStorage.ubifs
-rw-rw-r-- 1 cvisinescu cvisinescu  12M Jan 17 19:10 img-0_vol-Kernel.ubifs
-rw-rw-r-- 1 cvisinescu cvisinescu 124K Jan 17 19:10 img-0_vol-ManBlock.ubifs
-rw-rw-r-- 1 cvisinescu cvisinescu 124K Jan 17 19:10 img-0_vol-MBR.ubifs
这些卷表示设备使用的分区,其中一些是文件系统:
$ file *.ubifs
img-0_vol-Base.ubifs:            Squashfs filesystem, little endian, version 1024.0, compressed, 4280940851934265344 bytes, -1506476032 inodes, blocksize: 512 bytes, created: Sun Nov  5 14:27:44 2034
img-0_vol-Copyright.ubifs:       data
img-0_vol-Engine.ubifs:          Squashfs filesystem, little endian, version 1024.0, compressed, 7678397671131840512 bytes, 1610612736 inodes, blocksize: 512 bytes, created: Sat Nov 14 21:23:44 2026
img-0_vol-InternalStorage.ubifs: UBIfs image, sequence number 1, length 4096, CRC 0x44d52349
img-0_vol-Kernel.ubifs:          Linux Compressed ROM File System data, little endian size 11939840 version #2 sorted_dirs CRC 0x35eb963f, edition 0, 4424 blocks, 191 files
img-0_vol-ManBlock.ubifs:        data
img-0_vol-MBR.ubifs:             DOS/MBR boot sector; partition 1 : ID=0xff, active 0xff, start-CHS (0x3ff,255,63), end-CHS (0x3ff,255,63), startsector 4294967295, 4294967295 sectors; partition 2 : ID=0xff, active 0xff, start-CHS (0x3ff,255,63), end-CHS (0x3ff,255,63), startsector 4294967295, 4294967295 sectors; partition 3 : ID=0xff, active 0xff, start-CHS (0x3ff,255,63), end-CHS (0x3ff,255,63), startsector 4294967295, 4294967295 sectors; partition 4 : ID=0xff, active 0xff, start-CHS (0x3ff,255,63), end-CHS (0x3ff,255,63), startsector 4294967295, 65535 sectors
访问用户数据(可写分区)
本节描述了如何挂载img-0_vol-InternalStorage.ubifs,这是一个UBIFS映像。为此,必须执行多个步骤。
我们首先需要加载NAND闪存模拟器的内核模块。这个模块使用RAM来模拟物理NAND闪存设备。在运行下面的命令后,请检查Linux机器上的/dev/mtd0和/dev/mtd0ro文件夹以及dmesg的输出。这四个字节就是READ ID闪存命令(0x90)返回的值,同时,我们也可以在Micron NAND闪存数据手册的“Read ID Parameters for Address 00h”表格中找到它们。
$ sudo modprobe nandsim first_id_byte=0x2C second_id_byte=0xDA third_id_byte=0x90 fourth_id_byte=0x95
$ ls -l /dev/mtd*
模拟的NAND闪存的容量为256MB,每个擦除块是大小为128KB,这与物理闪存是一致的。由于我们只挂载了一个49MB的卷,因此,这里的容量应该不是问题:
$ cat /proc/mtd
dev:    size   erasesize  name
mtd0: 10000000 00020000 "NAND simulator partition 0"
$ dmesg | grep "nand:"
[50027.712675] nand: device found, Manufacturer ID: 0x2c, Chip ID: 0xda
[50027.712677] nand: Micron NAND 256MiB 3,3V 8-bit
[50027.712678] nand: 256 MiB, SLC, erase size: 128 KiB, page size: 2048, OOB size: 64
注意,dmesg报告的OOB大小是64字节,这是不正确的,因为它应该是128字节。然而,由于我们是在RAM中模拟NAND闪存,这并不是一个问题。在写这篇文章的时候,nandsim还不支持打印机使用的Micron NAND闪存的型号。
接下来,让我们从头到尾擦除所有的块。更多细节,请运行flash_erase --help命令以获取帮助:
$ sudo flash_erase /dev/mtd0 0 0
Erasing 128 Kibyte @ ffe0000 -- 100 % complete
在所有模拟的NAND闪存块被擦除后,让我们来格式化分区。第一个参数指定了最小的输入/输出单位,这里是页。第二个参数指定卷ID的偏移量,在我们的例子中是2048字节:
$ sudo ubiformat /dev/mtd0 -s 2048 -O 2048
ubiformat: mtd0 (nand), size 268435456 bytes (256.0 MiB), 2048 eraseblocks of 131072 bytes (128.0 KiB), min. I/O size 2048 bytes
libscan: scanning eraseblock 2047 -- 100 % complete
ubiformat: 2048 eraseblocks are supposedly empty
ubiformat: formatting eraseblock 2047 -- 100 % complete
我们还需要加载一个内核模块:
$ sudo modprobe ubi
$ ls -l /dev/ubi_ctrl
下面的命令用于将/dev/mtd0附加到UBI。第一个参数指示使用哪个MTD设备(即/dev/mtd0)。第二个参数指示要创建的UBI设备(即/dev/ubi0),该设备用于访问UBI卷。第三个参数用于指定卷ID的偏移量。
$ sudo ubiattach -m 0 -d 0 -O 2048
UBI device number 0, total 2048 LEBs (260046848 bytes, 248.0 MiB), available 2002 LEBs (254205952 bytes, 242.4 MiB), LEB size 126976 bytes (124.0 KiB)
$ ls -l /dev/ubi0
现在,让我们创建一个卷,将其命名为my_volume_InternalStorage,并通过/dev/ubi0_0(设备上的第一个卷)进行访问。下面分配与分区大小相等的卷的命令失败了,因为如前所述,每个擦除块使用两个页面作为UBI和卷头。因此,对于每个128KB的UBI擦除块,会损耗4KB。但是,我们可以创建一个240MB的卷(即1982个擦除块*124 KB/擦除块),这样就会比我们的img-0_vol-internalstorage.ubifs卷(49MB)大得多:
$ sudo ubimkvol /dev/ubi0 -N my_volume_InternalStorage -s 256MiB
ubimkvol: error!: cannot UBI create volume
          error 28 (No space left on device)

$ sudo ubimkvol /dev/ubi0 -N my_volume_InternalStorage -s 240MiB
Volume ID 0, size 1982 LEBs (251666432 bytes, 240.0 MiB), LEB size 126976 bytes (124.0 KiB), dynamic, name "my_volume_InternalStorage", alignment 1
$ ls -l /dev/ubi0_0
关于UBI设备的其他信息,可以使用ubinfo/dev/ubi0和ubinfo/dev/ubi0_0获得。现在,我们要将提取的卷映像放至UBI设备0和卷0中:
$ ubiupdatevol /dev/ubi0_0 img-0_vol-InternalStorage.ubifs
最后,我们可以使用下面的mount命令挂载UBI设备。此外,我们也可以使用sudo mount-t ubifs ubi0:my_volume_internalstorage mnt/命令:
$ mkdir mnt
$ sudo mount -t ubifs ubi0_0 mnt/
$ ls -l mnt/
drwxr-xr-x  2 root root  160 Mar  2  2020 bookmarkmgr
drwxr-xr-x  2 root root  232 Mar  2  2020 http
drwxr-xr-x  2 root root  400 Sep 10 15:21 iq
drwxr-xr-x  2 root root  160 Mar  2  2020 log
drwxr-xr-x  2 root root  160 Mar  2  2020 nv2
-rw-r--r--  1 root root    0 Mar  2  2020 sb-dbg
drwxr-xr-x  6 root root  424 Mar  2  2020 security
drwxr-xr-x 41 root root 2816 Mar 16  2021 shared
drwxr-xr-x  2 root root  224 Mar  2  2020 thinscan
在这个文件系统中,我们可以找到如下数据:
auth数据库,包含我们第一次设置打印机时的用户帐户(用户名和密码的哈希值)
一些公开的和已加密的私人证书
校准数据
要撤消所有操作,我们可以运行以下命令:
$ sudo umount mnt/
$ sudo ubirmvol /dev/ubi0 -n 0
$ sudo ubidetach -m 0
$ sudo modprobe -r ubifs
$ sudo modprobe -r ubi
$ sudo modprobe -r nandsim
访问打印机的二进制文件(只读分区)
本节描述如何提取img-0_vol-base.ubifs的内容,我们发现其中含有我们最感兴趣的二进制文件,接下来我们将对这些文件进行逆向分析:
$ unsquashfs img-0_vol-Base.ubifs
$ ls -l Base_squashfs_dir
drwxr-xr-x  2 cvisinescu cvisinescu 4096 Jun 22  2021 bin
drwxr-xr-x  2 cvisinescu cvisinescu 4096 Jun 22  2021 boot
-rw-r--r--  1 cvisinescu cvisinescu  909 Jun 22  2021 Build.Info
drwxr-xr-x  2 cvisinescu cvisinescu 4096 Mar 11  2021 dev
drwxr-xr-x 53 cvisinescu cvisinescu 4096 Jun 22  2021 etc
drwxr-xr-x  6 cvisinescu cvisinescu 4096 Jun 22  2021 home
drwxr-xr-x  8 cvisinescu cvisinescu 4096 Jun 22  2021 lib
drwxr-xr-x  2 cvisinescu cvisinescu 4096 Mar 11  2021 media
drwxr-xr-x  2 cvisinescu cvisinescu 4096 Mar 11  2021 mnt
drwxr-xr-x  5 cvisinescu cvisinescu 4096 Jun 22  2021 opt
drwxr-xr-x  2 cvisinescu cvisinescu 4096 Jun 22  2021 pkg-netapps
dr-xr-xr-x  2 cvisinescu cvisinescu 4096 Mar 11  2021 proc
drwx------  4 cvisinescu cvisinescu 4096 Jun 22  2021 root
drwxr-xr-x  2 cvisinescu cvisinescu 4096 Mar 11  2021 run
drwxr-xr-x  2 cvisinescu cvisinescu 4096 Jun 22  2021 sbin
drwxr-xr-x  2 cvisinescu cvisinescu 4096 Mar 11  2021 srv
dr-xr-xr-x  2 cvisinescu cvisinescu 4096 Mar 11  2021 sys
drwxrwxrwt  2 cvisinescu cvisinescu 4096 Mar 11  2021 tmp
drwxr-xr-x 10 cvisinescu cvisinescu 4096 Apr 18  2021 usr
drwxr-xr-x 13 cvisinescu cvisinescu 4096 Mar 16  2021 var
lrwxrwxrwx  1 cvisinescu cvisinescu   14 Jun 14  2021 web -> /usr/share/web
搞定!现在,我们已经提取出二进制文件,接下来,我们就可以对其进行逆向分析,并了解打印机的运行机制,其中也包括漏洞的成因。在下一篇文章中,我们将进一步向读者通过漏洞攻陷打印机的具体过程。
总结一下
综上所述,NAND闪存上的映像看起来包含:
TIMH:可信映像模块头部,这是Marvell特有的;
OBMI:第一个引导装载程序,由Marvell公司编写;
OSLO:第二个引导程序(U-Boot);
TRDX:Linux内核和设备树;
UBI映像:
Base分区:用于二进制文件的squashfs文件系统;
Copyright分区:原始数据;
Engine分区:squashfs文件系统包含的一些电机、皮带、风扇等的内核模块;
InternalStorage分区:用于用户数据的UBI FS映像(可写的);
Kernel分区:压缩的Linux内核;
ManBlock分区:原始数据,空分区;
MBR分区:主引导记录,包含相关分区的信息,这些分区包括Base、Copyright、Engine、InternalStorage和Kernel分区。
题外话……
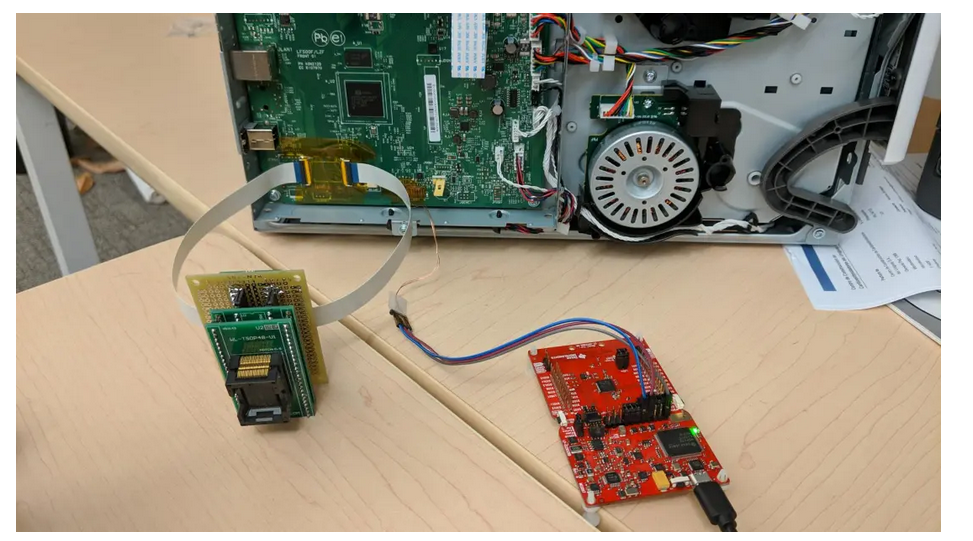
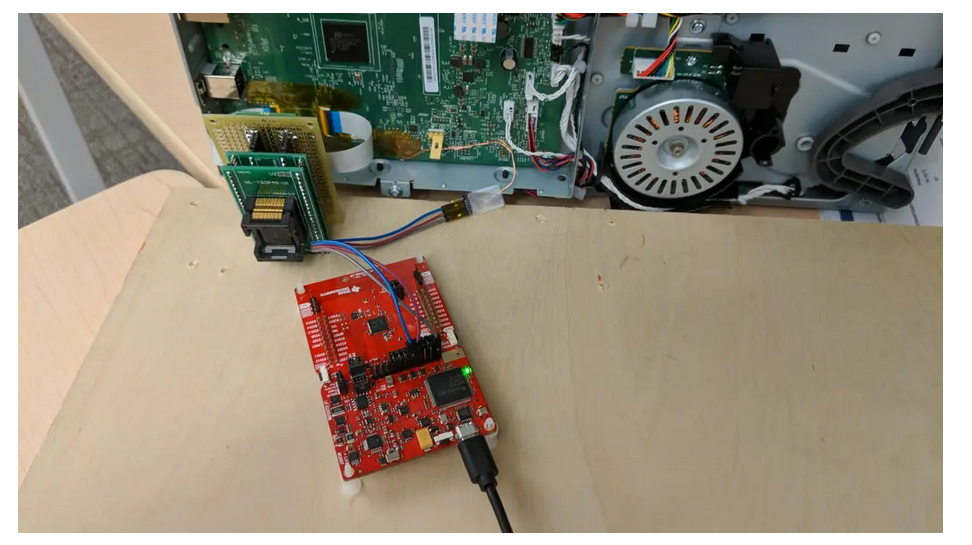
在项目的早期,我们首先尝试修改固件映像的部分(包括备用区域中的纠错代码)。但是,我们的最终目标是在一个实时系统上进行动态测试,并最终获得一个shell,以便通过它来转储二进制文件、查看正在运行的进程、检查文件权限以及理解Lexmark固件的工作方式。为此,我们需要对闪存进行反复编程。虽然我们可以可以将闪存重复连接到PCB上,但每次尝试,都有可能损坏芯片和安装闪存的PCB焊盘。此外,由于芯片短缺,从普通供应商那里订购替换闪存几乎是不可能的。因此,我们试图创建一个可以直接使用TSOP-48适配器的装置,简单来说,就是一个穷人的芯片插座。

虽然连接工作已经完成,但由于某种原因,该设备仍然无法通过U-Boot启动:
Si Ge2-RevB 3.3.22-9h 12 14 25
TIME=Tue Jun 08 20:32:27 2021;COMMIT=863d60b


uidc
Failure Enabling AVS workaround on 88PG870
setting AVS Voltage to 1050
Bank5 Reg2 = 0x000038E4, VoltBin = 0, efuseEscape = 0
AVS efuse Values:
                                Efuse Programed = 1
                                Low VDD Limit = 31
                                High VDD Limit = 31
                                Target DRO = 65535
                                Select Vsense0 = 0
a
Calling Configure_Flashes @ 0xFFE010A8 12 FE 13 E0026800
fves
DDR3 400MHz 1x16 4Gbit
rSHA compare Passed 0
SHA compare Passed 0
l
Launch AP Core0 @ 0x00100000


U-Boot 2018.07-AUTOINC+761a3261e9 (Jun 08 2021 - 20:32:14 +0000)

DRAM:  512 MiB
NAND:  256 MiB
MMC:   mv_sdh: 0, mv_sdh: 1, mv_sdh: 2
lxk_gen2_eeprom_probe:123: No panel eeprom option found.
lxk_panel_notouch_probe_gen2:283: panel uicc type 68, hw vers 19, panel id 98, display type 11, firmware v4.5, lvds 4
found smpn display TM024HDH49 / ILI9341 default
lcd_lvds_pll_init: Requesting dotclk=40000000Hz
found smpn display Yeebo 2.8 B
ubi0: default fastmap pool size: 100
ubi0: default fastmap WL pool size: 50
ubi0: attaching mtd1
ubi0: attached by fastmap
ubi0: fastmap pool size: 100
ubi0: fastmap WL pool size: 50
ubi0: attached mtd1 (name "mtd=1", size 253 MiB)
ubi0: PEB size: 131072 bytes (128 KiB), LEB size: 126976 bytes
ubi0: min./max. I/O unit sizes: 2048/2048, sub-page size 2048
ubi0: VID header offset: 2048 (aligned 2048), data offset: 4096
ubi0: good PEBs: 2018, bad PEBs: 8, corrupted PEBs: 0
ubi0: user volume: 7, internal volumes: 1, max. volumes count: 128
ubi0: max/mean erase counter: 4/2, WL threshold: 4096, image sequence number: 0
ubi0: available PEBs: 0, total reserved PEBs: 2018, PEBs reserved for bad PEB handling: 32
Loading file '/shared/pm/softoff' to addr 0x1f6545d4...
Unmounting UBIFS volume InternalStorage!
Card did not respond to voltage select!
bootcmd: setenv cramfsaddr 0x1e800000;ubi read 0x1e800000 Kernel 0xb63208;sha256verify 0x1e800000 0x1f363000 1;cramfsload 0x100000 /main.img;source 0x100000;loop.l 0xd0000000 1
Read 11940360 bytes from volume Kernel to 1e800000
Code authentication success
### CRAMFS load complete: 2165 bytes loaded to 0x100000
## Executing script at 00100000
### CRAMFS load complete: 4773552 bytes loaded to 0xa00000
### CRAMFS load complete: 5123782 bytes loaded to 0x1600000
## Booting kernel from Legacy Image at 00a00000 ...
   Image Name:   Linux-4.17.19-yocto-standard-2f4
   Image Type:   ARM Linux Kernel Image (uncompressed)
   Data Size:    4773488 Bytes = 4.6 MiB
   Load Address: 00008000
   Entry Point:  00008000
## Loading init Ramdisk from Legacy Image at 01600000 ...
   Image Name:   initramfs-image-granite2-2021061
   Image Type:   ARM Linux RAMDisk Image (uncompressed)
   Data Size:    5123718 Bytes = 4.9 MiB
   Load Address: 00000000
   Entry Point:  00000000
## Flattened Device Tree blob at 01500000
   Booting using the fdt blob at 0x1500000
   Loading Kernel Image ... OK
   Using Device Tree in place at 01500000, end 01516b28
UPDATING DEVICE TREE WITH st:1fec4000 sz: 12c000

Starting kernel ...

Booting Linux on physical CPU 0xffff00
Linux version 4.17.19-yocto-standard-2f4d6903b333a60c46f1f33da4b122d1 (oe-user@oe-host) (gcc version 7.3.0 (GCC)) #1 SMP PREEMPT Thu Jun 10 20:19:42 UTC 2021
CPU: ARMv7 Processor [410fd034] revision 4 (ARMv7), cr=30c5383d
CPU: div instructions available: patching division code
CPU: PIPT / VIPT nonaliasing data cache, VIPT aliasing instruction cache
OF: fdt: Machine model: mv6220 Lionfish 00d L
earlycon: early_pxa0 at MMIO32 0x00000000d4030000 (options '')
bootconsole [early_pxa0] enabled
FIX ignoring exception 0xa11 addr=a7ff7dfe swapper/0:1

starting version 237
mount: mounting /dev/active-partitions/Base on /newrootfs failed: No such file or directory
Unknown device, --name=, --path=, or absolute path in /dev/ or /sys expected.
mount: mounting /dev/active-partitions/Base on /newrootfs failed: No such file or directory
mount: mounting /dev/active-partitions/Base on /newrootfs failed: No such file or directory
mount: mounting /dev on /newrootfs/dev failed: No such file or directory
mount: mounting /tmp on /newrootfs/var failed: No such file or directory
ln: /newrootfs/var/dev: No such file or directory
BusyBox v1.27.2 (2021-03-11 21:59:45 UTC) multi-call binary.

Usage: switch_root [-c /dev/console] NEW_ROOT NEW_INIT [ARGS]

Free initramfs and switch to another root fs:
chroot to NEW_ROOT, delete all in /, move NEW_ROOT to /,
execute NEW_INIT. PID must be 1. NEW_ROOT must be a mountpoint.

        -c DEV  Reopen stdio to DEV after switch
Kernel panic - not syncing: Attempted to kill init! exitcode=0x00000100

CPU: 1 PID: 1 Comm: switch_root Tainted: P           O      4.17.19-yocto-standard-2f4d6903b333a60c46f1f33da4b122d1 #1
Hardware name: Marvell Pegmatite (Device Tree)
[< c001b3fc>] (unwind_backtrace) from [< c0015b7c>] (show_stack+0x20/0x24)
[< c0015b7c>] (show_stack) from [< c0637468>] (dump_stack+0x78/0x94)
[< c0637468>] (dump_stack) from [< c002f238>] (panic+0xe8/0x27c)
[< c002f238>] (panic) from [< c0034314>] (do_exit+0x61c/0xa6c)
[< c0034314>] (do_exit) from [< c0034818>] (do_group_exit+0x68/0xd0)
[< c0034818>] (do_group_exit) from [< c00348a0>] (__wake_up_parent+0x0/0x30)
[< c00348a0>] (__wake_up_parent) from [< c0009000>] (ret_fast_syscall+0x0/0x50)
Exception stack(0xd2e2dfa8 to 0xd2e2dff0)
dfa0:                   480faba0 480faba0 00000001 00000000 00000001 00000001
dfc0: 480faba0 480faba0 00000000 000000f8 00000001 00000000 480ff780 480fc4d0
dfe0: 47faf908 beaa2b74 47fee90c 4805aac4
pegmatite_wdt: set TTCR: 15000
pegmatite_wdt: set APS_TMR_WMR: 6912
CPU0: stopping
CPU: 0 PID: 0 Comm: swapper/0 Tainted: P           O      4.17.19-yocto-standard-2f4d6903b333a60c46f1f33da4b122d1 #1
Hardware name: Marvell Pegmatite (Device Tree)
[< c001b3fc>] (unwind_backtrace) from [< c0015b7c>] (show_stack+0x20/0x24)
[< c0015b7c>] (show_stack) from [< c0637468>] (dump_stack+0x78/0x94)
[< c0637468>] (dump_stack) from [< c001913c>] (handle_IPI+0x230/0x338)
[< c001913c>] (handle_IPI) from [< c000a218>] (gic_handle_irq+0xe4/0xfc)
[< c000a218>] (gic_handle_irq) from [< c00099f8>] (__irq_svc+0x58/0x8c)
Exception stack(0xc0999e68 to 0xc0999eb0)
9e60:                   00000000 c09f70a4 00000001 00000050 c09f70a4 c09f6f14
9e80: 00000005 c0a09cb4 dfe16598 00000005 00000005 c0999f04 c0999eb8 c0999eb8
9ea0: c0503684 c0503690 60000113 ffffffff
[< c00099f8>] (__irq_svc) from [< c0503690>] (cpuidle_enter_state+0x2bc/0x3a8)
[< c0503690>] (cpuidle_enter_state) from [< c05037f0>] (cpuidle_enter+0x48/0x4c)
[< c05037f0>] (cpuidle_enter) from [< c005f0e4>] (call_cpuidle+0x44/0x48)
[< c005f0e4>] (call_cpuidle) from [< c005f4a0>] (do_idle+0x1e0/0x270)
[< c005f4a0>] (do_idle) from [< c005f7f8>] (cpu_startup_entry+0x28/0x30)
[< c005f7f8>] (cpu_startup_entry) from [< c064bd54>] (rest_init+0xc0/0xe0)
[< c064bd54>] (rest_init) from [< c0913f40>] (start_kernel+0x418/0x4bc)
---[ end Kernel panic - not syncing: Attempted to kill init! exitcode=0x00000100 ]---
刚开始,我们怀疑可能是电缆太长,导致信号完整性出现问题,于是,我们改为使用较短的电缆,不幸的是,结果还是失败了。

折腾了半天,我们发现这条路好像走不通,所以,我们决定将时间投入到逆向二进制文件上面。事实证明,这是一个好主意,详情将在下一篇文章中加以介绍。
发表评论


 提供云计算服务